GCMとTitaniumとnode.jsでHelloWorld! (GoogleCloudMessaging for Androidのサンプルコード)

iOSのAPNSの時は簡単だったTitaniumでのPush通知の受信処理もAndroidだとやや複雑になってきます。
反面、証明書の手続きは簡単なので、ここではとりあえず動作させて雰囲気を確認する為の、ミニマムのサンプルコードを紹介します。
デベロッパーコンソールでの準備
- https://console.developers.google.com/project にて適当な名前(例:GcmTest)でプロジェクトを作ります。PROJECTIDは他と被らない様にしてください(例:com-kanasys-gcmtest)
- ここでProject Numberの後の数値を書き留めておきます。(例:123456789012)
- 先ほどの例のGcmTesterを選びAPIsから「Google Cloud Messaging for Android」を選びONにします。
- CredentialのPublic API AccessからServerKeyを作成します。そのままCreateしてください。
- APIKEYが表示されますのでこちらも書き留めておきます。
Titaniumアプリケーション
gcm.jsを使います。下からダウンロードしてTitaniumにインストールしておきます。
tiapp.xmlに以下を追加します。123456789012は先ほどのProject Numberを使います。
<property name="GCM_sender_id" type="string">123456789012</property>
<modules>
  <module platform="android" version="0.2">net.iamyellow.gcmjs</module>
</modules>
app.jsは以下のソースを使います。
win=Ti.UI.createWindow();
win.addEventListener('open',function(){
    var gcm=require('net.iamyellow.gcmjs');
    gcm.registerForPushNotifications({
        success:function(ev){
            Ti.API.info('Success:'+ev.deviceToken);
        },
        error:function(ev){
            Ti.API.info('Error:'+ev.error);
        },
        callback:function(data){
            Ti.API.info('ForgroundNotification:'+JSON.stringify(data));
        },
        unregister:function(ev){
            Ti.API.info('Unregister:'+ev.deviceToken);
        },
        data:function(data){
            Ti.API.info('BackgroundNotification:'+JSON.stringify(data));
        }
    });
});
win.open()
app.jsと同じフォルダにファイルを2つ作ります。このファイル名はモジュールに組み込まれているので変えてはいけません。
一つ目はgcm.jsです。バックグラウンドで通知を受け取った時に起動されます。ここではローカル通知に変換して再度通知を行います。
(function (service) {
    var serviceIntent = service.getIntent();
    var title=serviceIntent.hasExtra('title')?serviceIntent.getStringExtra('title'):'';
    var message = serviceIntent.hasExtra('message') ? serviceIntent.getStringExtra('message') : '';
    var launcherIntent=Ti.Android.createIntent({
        className: 'net.iamyellow.gcmjs.GcmjsActivity',
        action: 'action',
        packageName: Ti.App.id,
        flags: Ti.Android.FLAG_ACTIVITY_NEW_TASK | Ti.Android.FLAG_ACTIVITY_SINGLE_TOP
    });
    launcherIntent.addCategory(Ti.Android.CATEGORY_LAUNCHER);
    launcherIntent.putExtra("title",title);
    launcherIntent.putExtra("message",message);
    var notification=Ti.Android.createNotification({
        contentIntent:Ti.Android.createPendingIntent({intent:launcherIntent}),
        contentTitle:title,
        contentText:message,
        tickerText:title,
        icon:Ti.App.Android.R.drawable.appicon,
        flags:Ti.Android.FLAG_AUTO_CANCEL|Ti.Android.FLAG_SHOW_LIGHTS
        //sound: Ti.Filesystem.getResRawDirectory()+'sound.wav' //Sound file located at /platform/android/res/raw/sound.wav
    });
    Ti.Android.NotificationManager.notify(0, notification);
    service.stop();
})(Ti.Android.currentService);
もう一つはgcm_activity.jsです。ここがgcm.jsで作った通知を受け取ります。
(function (activity, gcm) {
    var intent = activity.intent;
    var title=intent.hasExtra('title')?intent.getStringExtra('title'):'No Title';
    var message=intent.hasExtra('message')?intent.getStringExtra('message'):'No Message';
    gcm.data = {
        title:title,
        message:message
    };
    if (gcm.isLauncherActivity) {
        var mainActivityIntent=Ti.Android.createIntent({
            className:gcm.mainActivityClassName,
            packageName:Ti.App.id,
            flags:Ti.Android.FLAG_ACTIVITY_RESET_TASK_IF_NEEDED|Ti.Android.FLAG_ACTIVITY_SINGLE_TOP
        });
        mainActivityIntent.addCategory(Ti.Android.CATEGORY_LAUNCHER);
        activity.startActivity(mainActivityIntent);
    }
    else {
        activity.finish();
    }
})(Ti.Android.currentActivity, require('net.iamyellow.gcmjs'));
ビルドするときはAndroidのマニフェストは自動生成させる様にしてください。そうすることで自動的にパーミッションやインテントの設定が行われます。
起動させ成功するとコンソールにデバイストークンが表示されますので書き留めておきます。もしサーバーからエラーがでる場合は、もう一度上の手順を見返して、Production Numberが正しいか、APIが有効になっているかを確かめてください。
また、アプリでパーミッション違反や停止が起こる場合は、上記のマニフェストの生成方法やファイル名に間違いがないかを確かめてください。
node.jsアプリケーション
さあ、通知を送ってみましょう。予めnode.jsをインストールしておいてください。
以下のgcm.jsファイルを作成します。APIKEYとDEVICETOKENはそれぞれ上で取得したAPIKEYとDEVICETOKENに変更してください。
#!/usr/bin/env node

var GCM = require('gcm').GCM;

var apiKey = '';
var gcm = new GCM("APIKEY");

var message = {
    registration_id: 'DEVICETOKEN',
    'data.title':'Hello World',
    'data.message':'From node.js',
};

gcm.send(message, function(err, messageId){
    if (err) {
        console.log("Something has gone wrong!");
    } else {
        console.log("Sent with message ID: ", messageId);
    }
});
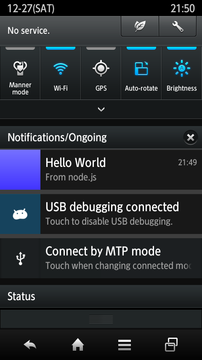
Androidアプリケーションを実行して一旦ホーム画面にしておきます。node.jsで送信スクリプトを実行してmessage IDが表示されると、ほどなくしてAndroid側のアプリケーションの方に通知が表示されるはずです。

